How to Use Ledger Nano X
Welcome to the world of secure cryptocurrency management! If you’re looking to take control of your digital assets, a hardware wallet like the Ledger Nano X is a fantastic choice. It provides a secure offline environment to store your private keys, protecting them from online threats. This comprehensive guide will walk you through everything from the initial setup to the process of adding crypto and beyond.
Getting Started: How to Use Ledger Nano X Nano X
Setting up your new hardware wallet for the first time is a crucial step. Follow these instructions carefully to ensure the security of your crypto.
Unboxing Your Device
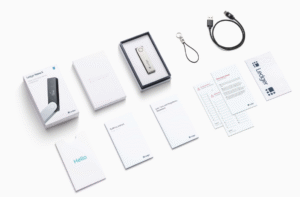
When you receive your package, the box should contain:
- Your Ledger Nano X device.
- A USB-C cable.
- A getting started leaflet.
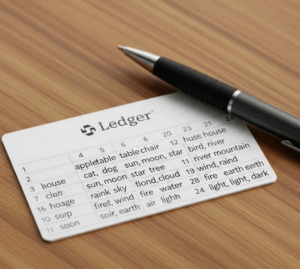
- Three recovery sheets.
- Stickers.
Ensure the box has not been tampered with. If you suspect it has, contact Ledger support immediately.

Initial Power On and Language Selection
- Connect your Ledger Nano X to your computer using the provided USB-C cable.
- The device will power on, and the Ledger logo will appear.
- Use the right button to scroll through the language options and press both buttons simultaneously to select your preferred language.
How to set up Ledger Nano X as a New Device
- The screen will display options: “Set up as new device” or “Restore from recovery phrase.” Since this is your first time, select “Set up as new device” by pressing both buttons.
Creating Your PIN Code
- You’ll be prompted to choose a PIN code. This PIN is essential for accessing your device, so make it strong but memorable (for you!).
- Press the right button to increase the number and the left button to decrease it.
- Press both buttons to select each digit.
- You will need to confirm your PIN code by entering it again.
Initial Power On and Configuration
- Connect the device to your computer using the provided USB-C cable.
- It will power on, and the Ledger logo will appear.
- Use the right button to scroll through the language options and press both buttons simultaneously to make your selection.
- The screen will display two options. Since this is your first time, select “Set up as new device” by pressing both buttons.
Creating Your PIN Code
- You’ll be prompted to choose a PIN code. This code is essential for daily access, so make it strong but memorable.
- Use the right and left buttons to change the digits.
- Press both buttons to confirm each digit of your PIN.
- You will need to confirm the full PIN code by entering it a second time.
Writing Down Your Recovery Phrase
This is the most important step of the entire process. Your 24-word recovery phrase is the only backup for your crypto assets if your device is lost, stolen, or damaged.
- Your Ledger will display your 24-word recovery phrase, one word at a time.
- Carefully write down each word in the exact order it appears on one of the provided recovery sheets.
- Double-check each word for spelling errors.
- Store your recovery sheets in a safe and secret physical location. Never store them digitally (e.g., in a text file, cloud storage, or as a photo).
- Once you’ve written down all 24 words, press both buttons to continue.

Confirming Your Recovery Phrase
- Your Ledger Nano X will now ask you to confirm a few random words from your recovery phrase.
- Use the buttons to select the correct word and press both buttons to confirm.
- Once the verification is complete, your Ledger Nano X is successfully set up!
Connecting to Ledger Live
Ledger Live is the companion application for your Ledger Nano X, allowing you to manage your accounts, install crypto apps, and perform transactions.
How to use Ledger Live
- Go to the official Ledger website (ledger.com) and navigate to the “Download Ledger Live” section.
-
- Download the correct version for your operating system (Windows, macOS, or Linux).
- Follow the on-screen instructions to install the application.
Pairing Your Device with Ledger Live
- Connect your unlocked hardware wallet to your computer.
- Open the Ledger Live application.
- Click on “Get started” and follow the prompts.
- Select “Ledger Nano X” when asked to choose your model.
- Click “Continue,” and Ledger Live will guide you through a simple pairing process.
How to Use Your Ledger Nano X to Rceive Crypto
Now that your device is set up and connected, let’s explore how to add crypto. Remember, your assets are not physically stored on the device. Instead, the private keys that control access to your crypto are stored securely offline.
Installing Apps
To manage a specific cryptocurrency, you need to install its corresponding application.
- In Ledger Live, go to the “Manager” tab.
- Connect and unlock your device. Allow the Ledger Manager on your hardware wallet by pressing both buttons.
- In the app catalog, search for the cryptocurrency you want to add (e.g., Bitcoin, Ethereum, Cardano).
- Click the “Install” button next to the desired app.
Creating Accounts in Ledger Live
After installing an app, you need to create an account for it within Ledger Live.
- Go to the “Accounts” tab and click the “Add account” button.
- Choose the cryptocurrency for the new account.
- Connect and unlock your Ledger, and open the corresponding app on the device screen.
- Ledger Live will sync and prompt you to add the new account. You can give it a custom name for easy identification.
- Finalize the process, and the new account will appear in your portfolio.
Receiving Cryptocurrency
To add funds, you need to generate a receiving address.
- In Ledger Live, select the account you want to receive crypto into and click “Receive.”
- Follow the prompts. Connect and unlock your device and open the correct app.
- Ledger Live will generate a receiving address. Crucially, verify that the address shown on your Ledger’s screen exactly matches the one displayed in Ledger Live.
- Once verified, copy the address and use it to send funds from your exchange or another wallet.
How to Use Your Ledger Nano X to Send Crypto
Sending crypto involves a similar verification process to ensure funds go to the right place.
- In Ledger Live, navigate to the account you want to send from and click “Send.”
- Enter the recipient’s address and the transaction amount.
- Review the details in Ledger Live and click “Continue.”
- Your hardware wallet will now display the transaction details. Carefully check the recipient’s address and the amount on your device’s screen.
- If everything is correct, press both buttons on your Ledger to approve and sign the transaction.
Ledger Nano X Security: Best Practices to Protect Your Assets
- Guard your recovery phrase: Never share it with anyone. Store it offline and securely.
- Always verify on-screen: Before any transaction, confirm that the address displayed on your physical device matches what you see on your computer.
- Protect your PIN: Choose a strong code and never store it with your recovery phrase.
- Use official software: Only download Ledger Live and firmware updates from the official Ledger website.
- Beware of phishing: Ledger will never ask for your 24-word recovery phrase. Never enter it anywhere except on a new Ledger device during a restoration process.
Troubleshooting Common Ledger Nano X Problems
- Device not recognized: Try a different USB cable or port. Ensure Ledger Live is up to date and restart your computer.
- App installation issues: You may be out of space. Uninstall apps you don’t frequently use to make room.
- Transaction stuck: This is often due to blockchain network congestion. You may need to wait, or if possible, rebroadcast the transaction with a higher fee.
Conclusion: Mastering Your Crypto Security
You now have the essential knowledge to use your new hardware wallet, from the initial setup to securely managing your digital assets. By following these guidelines and practicing good security habits, you can significantly enhance the safety of your cryptocurrency holdings. The combination of your physical device and the Ledger Live app provides a powerful solution for taking control of your financial future.
Frequently Asked Questions (FAQ)
- Is the Ledger Nano X safe? Yes, it is considered very safe because it stores your private keys offline on a certified secure chip, protecting them from online hacks.
- What cryptocurrencies are supported? The device supports thousands of different coins and tokens. You can check the official Ledger website for a complete and up-to-date list of supported assets.
- What happens if I lose my Ledger? Your crypto is safe as long as you have your 24-word recovery phrase. You can use this phrase to restore access to your funds on a new Ledger device or another compatible wallet.
- Does Ledger Live hold my crypto? No, Ledger Live is an interface that allows you to view and manage your portfolio. Your assets are secured on the blockchain, and your private keys—which grant access—never leave your physical device.
- How many apps can I install? The Nano X has more storage than previous models and can typically hold up to 100 applications simultaneously, depending on their size.
- Does the device always need to be connected to a computer? No, it only needs to be connected when you are actively managing your assets (sending funds, installing apps, etc.). It also has Bluetooth for mobile use.
- What if I forget my PIN code? After three incorrect PIN entries, the device will reset to factory settings as a security measure. You can then restore your accounts using your 24-word recovery phrase.
Ready to Secure Your Crypto? Buy Your Ledger Nano X
Now that you understand the power and security of a hardware wallet, it’s time to take control of your digital assets. Investing in a top-tier device is the single most important step you can take to protect your cryptocurrency.
Purchase your authentic Ledger Nano X from a trusted source today and start your journey towards financial sovereignty.
