How to transfer crypto from Coinbase to a hardware wallet
The Ultimate 2025 Guide: How to Securely Transfer Crypto from Coinbase to a Hardware Wallet
Welcome to the world of digital assets, where the phrase "not your keys, not your crypto" is the golden rule. While using an exchange like Coinbase is a fantastic and user-friendly way to buy your first Bitcoin or Ethereum, leaving your assets there long-term is like leaving a stack of cash on a park bench. It's convenient, but it exposes you to risks you don't have to take.
The solution? Taking control of your assets by transferring them to a hardware wallet. This process, often called moving to "cold storage," is the single most important step you can take to secure your crypto investment for the long haul. It might sound intimidating, but it's more straightforward than you think.
This comprehensive guide will walk you through everything you need to know. We’ll cover why moving your crypto is crucial, how to choose the right wallet, and provide a detailed, step-by-step walkthrough on how to transfer your crypto from Coinbase to a hardware wallet safely and confidently.
Why You Absolutely Need to Move Your Crypto Off Coinbase
Using Coinbase is simple and efficient, but it's essential to understand the difference between an exchange account and true ownership. When you hold crypto on an exchange, you are entrusting a third party with your private keys and, therefore, your funds.
The Dangers of Exchange Wallets: Beyond Convenience
While major exchanges like Coinbase have robust security measures, they remain a prime target for sophisticated hackers. History is filled with examples of exchanges being compromised, resulting in the loss of millions of dollars in customer funds. Beyond hacks, other risks include:
- Account Freezes: Exchanges can freeze your account for various reasons, including security alerts or regulatory demands, leaving you unable to access your funds when you need them most.
- Insolvency Risk: If an exchange goes bankrupt, as seen with FTX and others, your assets held on the platform could be tied up in legal proceedings for years, with no guarantee of full recovery.
- Centralized Control: The very essence of cryptocurrency is decentralization. Leaving your assets on a centralized platform goes against this core principle and places your financial sovereignty in someone else's hands.
The Golden Rule of Crypto: "Not Your Keys, Not Your Crypto" Explained
Your cryptocurrency is secured by a pair of cryptographic keys: a public key and a private key. The public key generates your wallet address, which you can share freely to receive funds. The private key, however, is the secret password that proves ownership and authorizes transactions. Whoever controls the private key controls the crypto.
A hardware wallet is a physical device designed to keep this private key completely offline, away from the internet and potential hackers. By moving your assets from Coinbase to a hardware wallet, you take sole possession of your private keys, achieving true self-custody and becoming your own bank.

Choosing the Right Hardware Wallet for Your Needs
The hardware wallet market has grown significantly, offering a range of devices to suit different needs and budgets. Understanding the basics will help you make an informed choice.
What is a Hardware Wallet (or Cold Wallet)?
A hardware wallet, or cold wallet, is a physical device that stores your private keys in an isolated, offline environment. When you want to send crypto, you connect the device to your computer or phone. The transaction is prepared on your computer, but the final, critical step of signing it with your private key happens inside the secure chip of the hardware wallet itself. The private key never leaves the device, ensuring it remains safe from malware, viruses, or keyloggers on your computer.
Top Contenders: Trezor vs. Ledger and Other Key Players
The two most recognized names in the hardware wallet space are Ledger and Trezor. Both offer excellent security and user-friendly experiences.
- Ledger (e.g., Nano S Plus, Nano X): Known for its secure element chip (similar to those in passports and credit cards) and the sleek Ledger Live companion app. The Nano X offers Bluetooth for mobile convenience.
- Trezor (e.g., Model One, Model T): A pioneer in the space, Trezor is fully open-source, which many in the crypto community see as a major security advantage. The Model T features a user-friendly color touchscreen.
Key Features to Look For
When selecting a wallet, consider the following:
- Coin Support: Ensure the wallet supports all the cryptocurrencies you plan to store.
- Security Reputation: Choose a brand with a long-standing, positive reputation in the community.
- Ease of Use: Look for a device with intuitive software and a clear screen for verifying transactions.
- Source: Crucially, always buy your hardware wallet directly from the manufacturer or an authorized reseller. Never buy a used device, as it could be tampered with.
Before You Transfer: A Pre-Flight Checklist
Proper setup is vital for the security of your hardware wallet. Do not rush this process. Set aside at least 30-60 minutes in a private, distraction-free environment.
Step 1: Setting Up Your New Hardware Wallet
When your wallet arrives, inspect the packaging to ensure it's tamper-proof and hasn't been opened. Once you're satisfied, begin the setup:
- Generate a New Wallet: Power on the device and follow the on-screen instructions to create a new wallet.
- Write Down Your Recovery Phrase: The device will display a 12 or 24-word recovery phrase (also called a seed phrase). This is the master key to all your crypto. Write these words down carefully on the provided card, in the correct order. This phrase is your only backup if your device is lost, stolen, or damaged.
- Verify the Phrase: The device will ask you to re-enter some or all of the words to confirm you have recorded them correctly.
- Set a PIN Code: Create a strong PIN for daily access to your device.
Security Tip: Never, ever take a digital photo of your recovery phrase or type it into any computer, phone, or website. Keep it strictly offline.
Step 2: Installing the Necessary Software (Ledger Live / Trezor Suite)
Next, go to the official website of your wallet's manufacturer (e.g., ledger.com or trezor.io) and download their companion software. This application allows you to manage your portfolio, install apps for different cryptocurrencies, and initiate transactions.

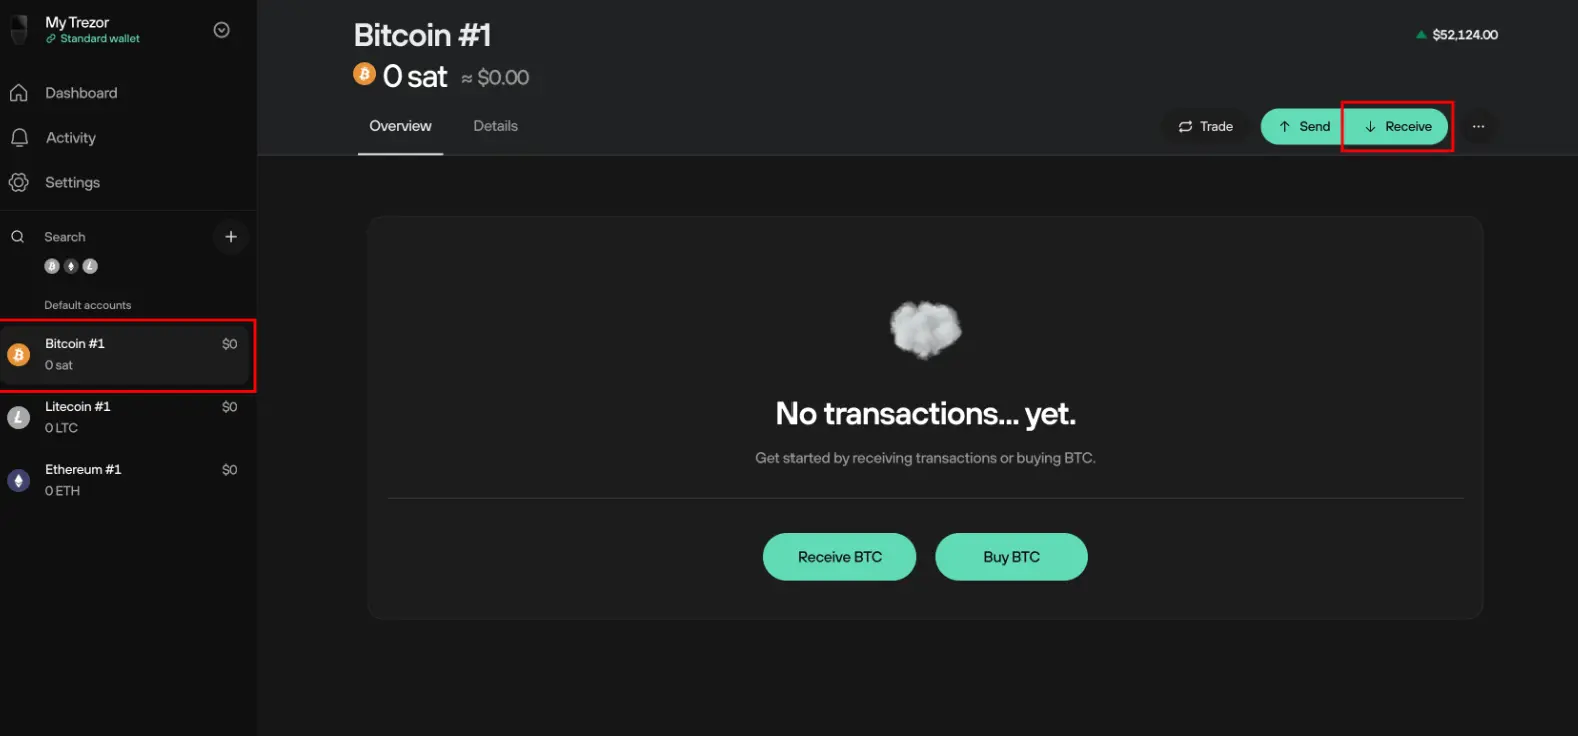
Step 3: Finding Your Hardware Wallet's Receiving Address
To move crypto from Coinbase, you need to tell it where to send the funds. This is your hardware wallet's "receiving address."
- Open the companion app (e.g., Ledger Live).
- Connect and unlock your hardware wallet.
- Select the account for the crypto you want to receive (e.g., Bitcoin).
- Click "Receive." The software will show you a receiving address.
- Crucially, your hardware wallet's physical screen will also display this address. You must compare the address on your computer screen with the one on your device's screen. If they match, you can be sure it's the correct, secure address.
The Main Event: Step-by-Step Guide to Transferring from Coinbase
With your hardware wallet set up and your receiving address verified, you're ready to initiate the transfer from Coinbase.
Initiating the Withdrawal on Coinbase (Desktop and Mobile)
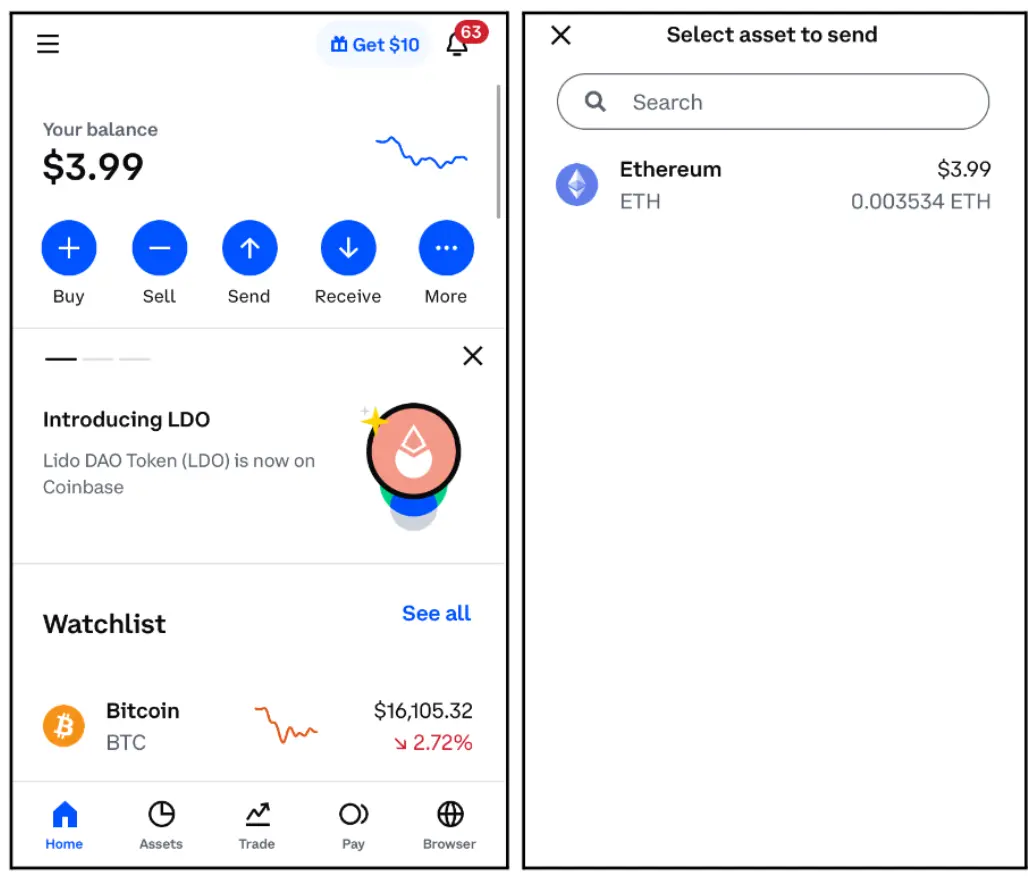
- Log in to your Coinbase account.
- Click the "Send & Receive" or "Send / Receive" button, usually located in the top-right corner.
- A pop-up window will appear. In the "Send" tab, choose the cryptocurrency you want to transfer from the "Pay with" dropdown.

Executing the Transfer: A Detailed Walkthrough
This is the most critical part of the process. Be meticulous.
- Send a Small Test Amount First: Before moving your entire balance, always send a small, non-trivial amount (e.g., $20 worth) as a test. This allows you to verify that the process works and that you've done everything correctly without risking all your funds.
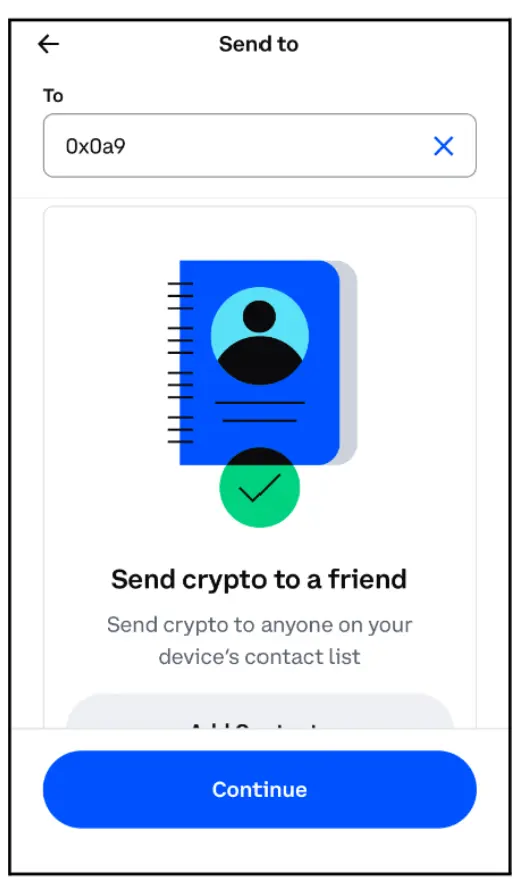
- Enter the Recipient Address: In the "To" field on Coinbase, carefully paste the receiving address you generated and verified from your hardware wallet.
- Double and Triple-Check the Address: Seriously. Check the first 4-5 and last 4-5 characters of the address on the Coinbase screen against the address in your hardware wallet app and, ideally, against the physical device's screen one last time. Malware known as "clipboard hijackers" can change a copied address, so this visual verification is your best defense.
- Enter the Amount: Input the amount for your test transaction.
- Review and Send: Click "Continue" or "Preview Send." Coinbase will show you a summary including the network fee. If everything looks correct, confirm the transaction.
- Complete 2FA: You will be prompted to enter your Two-Factor Authentication (2FA) code to authorize the withdrawal.

Verifying the Transaction
Once you've sent your test transaction, wait for it to arrive in your hardware wallet. You can monitor its progress:
- In Coinbase: Your transaction history will show the withdrawal as "Pending" and then "Completed."
- On a Block Explorer: Coinbase will provide a transaction ID (TxID). You can copy this and paste it into a block explorer for that specific cryptocurrency (e.g., blockchain.com for Bitcoin, etherscan.io for Ethereum) to see its status on the network.
- In Your Hardware Wallet App: Once the transaction has enough confirmations on the blockchain, your balance will appear in your Ledger Live or Trezor Suite app.
After your test amount successfully arrives, you can confidently repeat the process to transfer the rest of your funds.
Post-Transfer: Best Practices for Ultimate Crypto Security
Your responsibility doesn't end once the transfer is complete. Securing your hardware wallet and recovery phrase is an ongoing process.
Securing Your 24-Word Recovery Phrase
Your recovery phrase is the ultimate backup. Protect it at all costs.
- Never Store It Digitally: This means no photos, no text files, no password managers, no cloud storage. Keep it 100% offline.
- Use Metal Storage: For protection against fire and water damage, consider stamping your seed phrase onto a steel plate.
- Store Securely: Keep your written or stamped phrase in a secure location, like a safe. Some people store copies in multiple secure locations (e.g., a safe at home and a safe deposit box).
Frequently Asked Questions (FAQ)
1. How much does it cost to transfer crypto from Coinbase to a hardware wallet?
Coinbase does not charge a fee for the withdrawal itself, but you will have to pay a "network fee" (or "miner fee"). This fee goes to the network operators who validate the transaction. It varies based on the cryptocurrency and how busy the network is at that moment. Coinbase will show you an estimate of this fee before you confirm the transaction.
2. How long does the transfer take?
Transfer times depend on the network congestion of the specific blockchain. Bitcoin transfers can take anywhere from 10 minutes to over an hour. Ethereum is usually faster, often taking just a few minutes. You can track the progress using the transaction ID on a block explorer.
3. Can I transfer any cryptocurrency from Coinbase to my hardware wallet?
You can only transfer cryptocurrencies that are supported by your specific hardware wallet. Most wallets like Ledger and Trezor support hundreds of coins and tokens, including all the major ones available on Coinbase. Always check your wallet's coin support list first.
4. What happens if I lose my hardware wallet or it breaks?
This is why your 24-word recovery phrase is so important! If your device is lost, stolen, or damaged, you can simply buy a new hardware wallet (from any compatible brand), choose the "restore from recovery phrase" option during setup, and enter your 24 words. You will regain full access to all your crypto.
5. Is it safe to buy a used hardware wallet?
Absolutely not. A used or pre-configured wallet could have been tampered with. A scammer could have already recorded the recovery phrase and would be waiting for you to deposit funds before stealing them. Always buy directly from the manufacturer or an authorized reseller like the one linked below.
6. Why is sending a small test amount so important?
Crypto transactions are irreversible. If you make a mistake and send your funds to the wrong address, they are gone forever. A small test transaction confirms your address is correct and you understand the process, giving you peace of mind before moving a larger sum.
7. Can I reverse a crypto transaction after sending it from Coinbase?
No. Once a transaction is broadcast to the blockchain and confirmed, it is permanent and cannot be reversed or cancelled by you, Coinbase, or anyone else. This immutability is a core feature of cryptocurrency, which is why triple-checking the address is so vital.
Conclusion: Taking Control of Your Financial Sovereignty
Transferring your crypto from Coinbase to a hardware wallet is a rite of passage for every serious investor. It marks the transition from simply owning a digital IOU on an exchange to taking true, sovereign ownership of your assets. It protects you from exchange hacks, corporate failures, and account freezes, placing you in complete control.
By following the steps outlined in this guide—from choosing the right wallet to meticulously checking addresses and securing your recovery phrase—you can navigate this process with confidence. You are not just moving digital ones and zeros; you are securing your financial future and embracing the power of decentralization.
Ready to secure your assets? Explore top hardware wallets at DirectHW.com today and take the first step towards true crypto ownership.
